Static map charts
1. Select Country dimension in Invoice cube
Make sure you are using ISO 3166-1 alpha-2 code (2 letter code) as customer country code in HansaWorld. These codes will then be converted to full country names by flex.bi application.
At first select Country dimension in HansaWorld Invoice cube and select country level on rows and necessary measures on columns (the first column will be used to calculate the color of the region on a map).

2. Select the corresponding map
Go to Map tab and select the corresponding map (world map, Europe map or particular country map).

The countries are mapped with the ISO two letter codes. As well the country names you can see when hovering over the country in the map will be recognized. Additional aliases are added to recognize USA, US and United States.
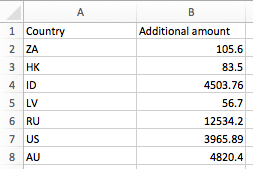
3. Import additional data
If you have additional data (outside HansaWorld) you want to import to country dimension, you can do it from excel or csv file.
Make sure you are using ISO two letter codes to identify the country.
Maps with geocoding (Only for Enterprise users)
1. Create a TomTom account
For the geocoding feature to work, you have to create an account with TomTom (https://developer.tomtom.com/user/register) and get a consumer API key for the Search app. Please check the TomTom documentation regarding the amount of free API calls per day and the information about purchasing additional credit for the TomTom service.
2. Enable geocoding
Geocoding is used to link customer addresses to longitude and latitude values.
Add the following code to your config/eazybi.toml file:
[[regular_jobs]]
job = "Geocoding.perform"
every = "24h"
Specify a new regular job Geocoding.perform and the frequency for execution of this job. In the code example below, a frequency of 24h is set. You can specify a value that corresponds to your needs.
Add the following code to the [general] section of your config/eazybi.toml file:
tomtom_api_key = "<your_tomtom_api_key>"
tomtom_base_URL = "api.tomtom.com"
tomtom_version_number = "2"
In the code block above, you have to replace <your_tomtom_api_key> with your actual TomTom API key. Also you have to check if the defined version is the current version of the API.Define the following plan parameters in the Update Account section's Plan parameters box of your flex.bi account:
enable_geocoding = true
min_address_precision = 8
min_address_similarity = 0.85
- min_address_precision is the minimum geocoding result precision that is required to save the latitude and longitude values. The default value is 8, but you can increase it, to make the rules for result acceptance more strict, or decrease it, to make the rules less strict. The precision is a value returned by the TomTom service together withe the geocoding results, which specifies how precise are the returned results based on the TomTom algorithm.
- min_address_similarity is the minimum similarity between the original address and the address returned from the geocoding service. The default value is 0.85, but you can increase it, to make the similarity rules more strict, or decrease it, to make the rules less strict. The similarity is a value calculated by comparing the address saved in flex.bi and the results returned from the TomTom geocoding service.
If one of the mentioned minimal values are not met by the result received from the TomTom geocoding service, it is deemed to be too imprecise and is not saved in flex.bi. The affected customer/supplier record is assigned a value of -1 for the property Geocoding needed and is skipped during the next geocoding runs, until the customer/supplier information is altered, providing more address details. Also the address and precision returned from the geocoding service is saved in Address Precision and Geocoding address properties, respectively, to help you determine if you should adjust the address information in flex.bi or the minimum precision or similarity parameters, to get better geocoding results.
3. Import your data
If you haven't imported any data yet, proceed with data import.
If you had some data imported, you don't to need to empty the cube. Geocoding process will begin next time, when customer (CUVc) file is imported. To start it right away, just upload or delete data from existing customer (CUVc) file and import application.
For a large customer register, this process can take some time, even after data import, but the values will be updated as it happens.
4. Select calculated member for latitude and longitude
Select Customers in rows and Measures in columns. From calculated members section Customer properties select "Customer latitude" and "Customer longitude". These measures should be the first selected measures in precisely this order - latitude, longitude.

5. Select measures you wish to use in your map chart
Select all other measures, that you want to see, when hovering over location on map.

6. Select OpenStreetMap or Wikimedia map
Go to Map tab and select OpenStreetMap or Wikimedia map.
By hovering over a point on map, you can see selected measures for the location.
