Support center for flex.bi version 3.2
Basic Concepts
Juris Aidma (Deactivated)
Laima (Deactivated)
Elvis Kvalbergs
Here are the descriptions of the main terms used in Flex.bi
Account
One account contains a set of data which can be analysed by one or many account users. In any given time you can work with one selected user account. You can select the current account either from the dashboard or from the "Select or Change account" link in the top right corner of the screen.
Accounts can be created as public for accounts that contain public data and you want every user to be able to access it. If the account is private then only the account users specified under "Account users" can access account data.
Each account has a subscription plan - there are free subscription plans as well as paid subscription plans with a monthly subscription fee.
Account users
When you add a new account user then it is recommended that this user at first registers for eazyBI with his or her email address. When registration is complete then you need to specify this user's email in the Add account user input box. If you both are users in some other account then eazyBI will suggest other known users either by their name or email. The user who creates the account is known as the Owner of the account. The owner has all available rights for that account and the owner can add additional users to the account and specify their rights. In the case of private accounts only specified account users will have access to the account data.
When you add new users to the account you need to specify their role. A User admin will be able to add new users, a Data admin will be able to import source data and define calculated dimension members (see below), a User will be able to analyse data and also save reports, a Viewer will be able to analyse data and just open existing reports but will not be able to save reports. A User admin has the rights of a Data admin and a User, the Data admin also has the same rights as a User.
Source Data
After creating a new account you will need to import data which you want to analyse. There are two ways how to import data - either you upload source data files or import data from a source application for which an eazyBI data import is defined.
Source Files
Currently only import from CSV format files is supported (other formats will be supported later, please write feedback if you want support for some specific file format). After uploading the source data files you need to define the mapping from source file columns to cube dimensions and measures (see Cubes, Dimensions and Measures below).
Cubes
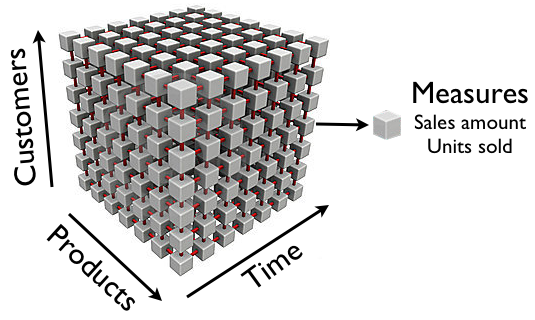
Imported data is stored in multi-dimensional data cubes. Cubes contain fact data that are divided by dimensions and each detailed fact "cell" contains measure values about that fact. This is an example of a Sales cube that has Customers, Products and the Time dimensions and has two measures - Sales amount and Units sold. Each detailed cube "cell" contains sales amount and units sold for particular product, customer and time period:

It is easy to illustrate cube with three dimensions but you can have as many dimensions and as many measures as you need in one data cube.
All measures in the same cube share the same dimensions. If in one account you want to store different types of measures that do not share the same dimensions then you can create several different cubes.
Dimensions
Typical cube dimensions are Time, Customers, Products, Locations, Employees, Projects etc. Use dimensions that are best suited to your business domain.
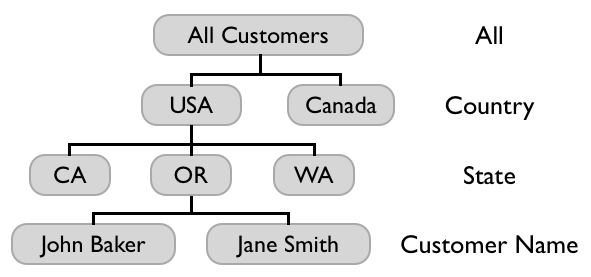
Each dimension can have either just detailed level of all dimension members or you can define hierarchy with several levels. For example, Customers dimension could have Country, State and Customer Name levels:

All measures are automatically aggregated (typically as sum of detailed level values) in upper hierarchy levels. E.g. looking at Sales amount measure at Country level will give total sales amount for this country.
Typically each dimension has an All level with one All member which aggregates all dimension members.
When you upload a source file with a date (or date & time) column then a time hierarchy is automatically constructed for corresponding dimension. The time hierarchy will have Year, Quarter, Month and Day levels which can be used to get totals of measures at selected time period levels.
Measures
Measures typically are integer or decimal values that can be accessed either at the detailed dimension member level or can be aggregated at higher dimension levels. Typical measure examples could be Sales amount, Units sold, Cost amount, Transactions count etc.
Calculated members
Sometimes you want to calculate new measures from other existing cube measures - these are called calculated measures. For example, you could define the Profit calculated measure as the Sales amount measure minus the Cost amount measure. And then you could also define the Margin % calculated measure as the Profit measure divided by the Sales amount measure (and then display the result as a percentage).
You can also define calculated members in other dimensions. For example, you could define a new calculated member North America as the sum of the USA and Canada members in the Customers dimension.
Calculated member formulas are defined using the MDX language. Basic arithmetic formulas can be created very easily but by learning other MDX functions you will be able to create any calculated members you need. Read more about creating calculated members.
Analyse and create reports
After importing data from source files or source applications you can go to the Analyse tab and start to explore data in the created cube. You can start creating table reports by dragging needed dimensions to columns, rows and pages and exploring your data at different dimension levels. After selecting the needed data in a table report you can switch to different chart reports to explore your data in a more visual way.
When you have created a report layout that you want to use frequently you can save this report with a given name. When you later open a saved report then you will get the latest results from the data cube using the saved report layout.
Learn more about Analyse tab in Creating reports and Creating charts help pages.
Data export from HansaWorld into flex.bi
Learn more about exporting data from HansaWorld and into flex.bi here.
See Video that explains Basic concepts and shows process of connecting data and creating reports.