Support center for flex.bi version 4.0
Trends and Forecasts
- Gvido
- Miks Valers
- Laima (Deactivated)
By following the instruction in this solution page you will be able to create the following reports:
Current month forecast - a forecast for the current month
The report live: https://flex.bi/bi/accounts/47/cubes/HansaWorld%20Invoices/reports/1896-current-month-forecast
Trend over 12 months - line of a trend over 12 months
The report live: https://flex.bi/bi/accounts/47/cubes/HansaWorld%20Invoices/reports/1897-12-month-trend
12 month projection - a projection of a trend over the next 12 months
The report live: https://flex.bi/bi/accounts/47/cubes/HansaWorld%20Invoices/reports/1928-12-month-projection
2 year average - average value of the last 2 years
The report live: https://flex.bi/bi/accounts/47/cubes/HansaWorld%20Invoices/reports/1930-2-year-average
- Difference Projection/Fact -
The report live: https://flex.bi/bi/accounts/47/cubes/HansaWorld%20Invoices/reports/2225-difference-projection-fact - Target forecast for person
The report live: https://flex.bi/bi/accounts/47/cubes/HansaWorld%20Invoices/reports/1949-target-forecast-for-person - Reports +35% -
The report live: https://flex.bi/bi/accounts/47/cubes/HansaWorld%20Invoices/reports/2245-12-month-projection-35
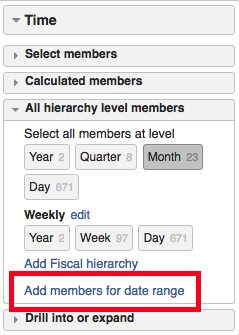
Adding future date range
First of all, to make the reports work go under the Time dimension → All Hierarchy level member and click the "Add members for date range" function:
Go ahead and create a data range for your current year or the next year as well like shown in example:
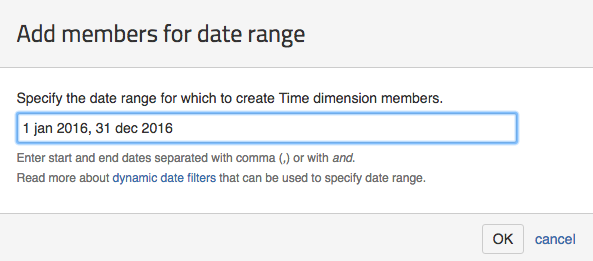
For example, if you want to create date range for the next year as well you should type "1 jan 2017, 31 dec 2017" or you can just type in "1 jan 2016, 31 dec 2017"
You should create dates as far as you want values for them in the report to be shown. For example, we have a report that shows values for 12 months. Let's say it's November 2016 now. So that means that 12 months ahead from November 2016 will be November 2017 and I would have to create member at least for that month. So in order for the report to work I would type in "1 jan 2016, 31 dec 2017". I could add also the next year so that I don't have to to this again when it's January 2017 because then I won't have a date for January 2018.
If you want to create your custom range you can read more about it on our documentation page about How to filter Time dimension members - last 3years, time until today?.
Setting up "Current month forecast" report
First, go ahead and follow the instructions on the Report templates library page to import the report's definition that is found here: https://flex.bi/bi/accounts/47/cubes/HansaWorld%20Invoices/reports/1896-current-month-forecast
Then, if you haven't yet, please go add future data range.
Customising measure
Next you can change change the measure that the forecast is shown by you just have to edit the calculated member "AVG item base amount this month" that is found in "Measures" dimension. It should look like this:
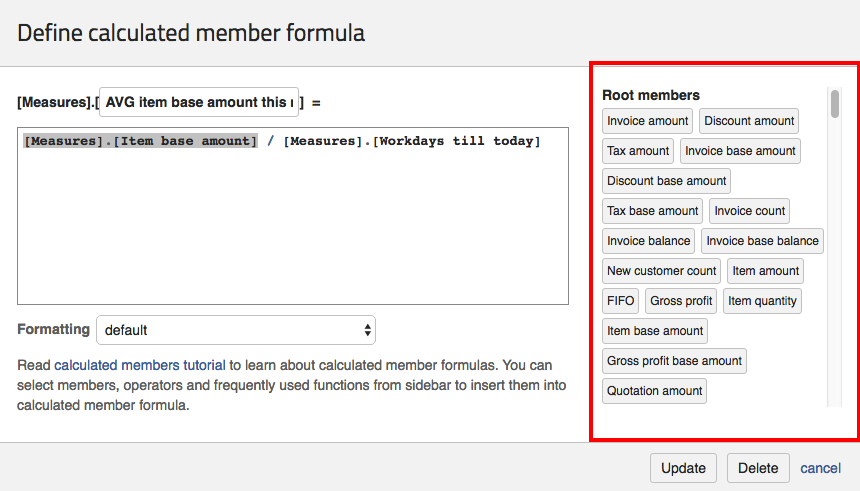
What you have to do is change the [Measures].[Item base amount] measure that I have marked to one of the measures that are found in the calculated member list. You can insert the measure in the text field just by clicking on it. Find the member you want to use, click "update" and have the forecast will change to the measure you wanted.
For example, if you would like to see the trend for the default measure "Invoice count" then you would have to replace [Measures].[Item base amount] with [Measures].[Invoice count].
You can also freely edit the calculated member's name.
Setting up "Trend over 12 months" report
First, go ahead and follow the instructions on the Report templates librart page to import the report's definition that is found here: https://flex.bi/bi/accounts/47/cubes/HansaWorld%20Invoices/reports/1897-12-month-trend
Customising date range
If you want to change the date range that the trend is calculated by you have to edit the "Rank 12 months" calculated member.
For example, if you want the data range to be from January 2017 to June 2017 then, first, you open the calculated member:
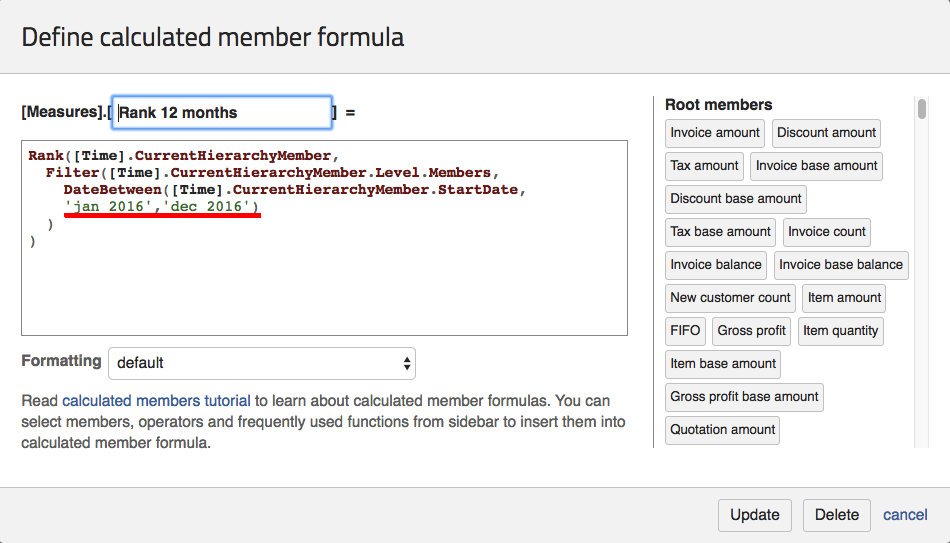
And change the 'jan 2016' to 'jan 2017' and 'dec 2016' to 'June 2017'. You can change to any month you would like by using the first 3 letter of the month name or by using the full month name as well. For example, 'January 2017' and 'June 2017'.
You can read more about how to use correct dates in How to filter Time dimension members - last 3years, time until today? page.
You can also freely edit the calculated member's name.
Customising the measure
If you would like to change the measure that the trend is about then you have to edit "12 month trend" calculated member.
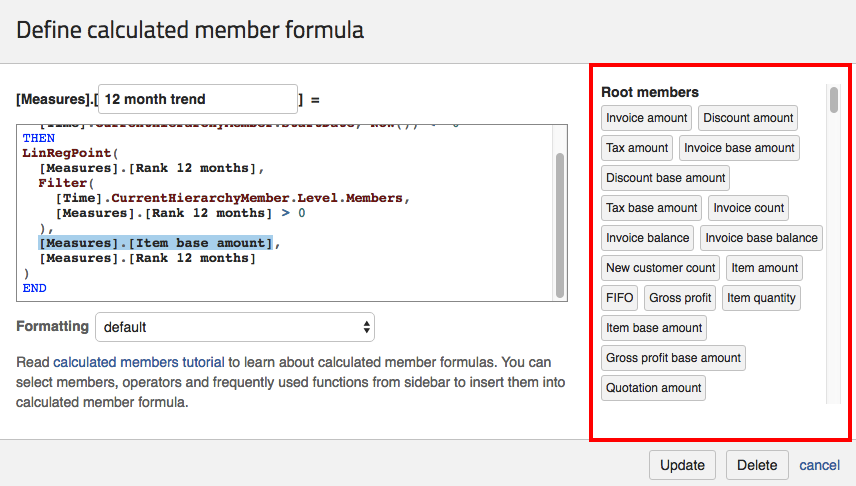
What you have to do is change the [Measures].[Item base amount] measure that I have marked to one of the measures that are found in the calculated member list. You can insert the measure in the text field just by clicking on it. Find the member you want to use, click "update" and have the forecast will change to the measure you wanted.
For example, if you would like to see the trend for the default measure "Invoice count" then you would have to replace [Measures].[Item base amount] with [Measures].[Invoice count].
You can also freely edit the calculated member's name.
Setting up "12 month projection" report
First, go ahead and follow the instructions on the Report templates library page to import the report's definition that is found here: https://flex.bi/bi/accounts/47/cubes/HansaWorld%20Invoices/reports/1928-12-month-projection
This report also includes "Trend over 12 months". You can go set it up following the instructions here or you can just disable to calculated member if you don't want it to be shown.
Then, if you haven't yet, please go add future data range.
Customising prediction date range
To customise the data range that the trend slope is calculated by go follow the same instructions here: Customising data range. Just note that changing the calculated member will also change the "Trend over 12 months" report's data range the same way as well.
Customising the measure
Since this report also uses value from "Trend over 12 months" report to change the measure first go also customise "Trend over 12 months" measure.
Next, If you would like to change the measure that the prediction is about then you have to edit "12 month trend slope" calculated member:
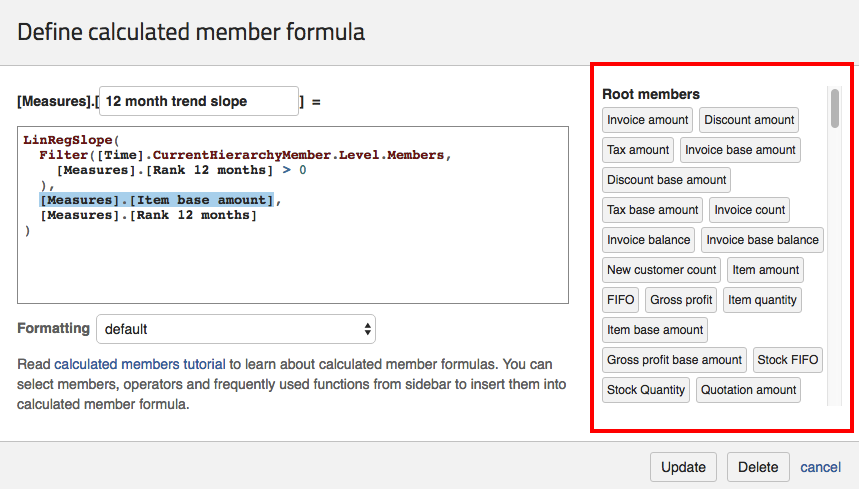
What you have to do is change the [Measures].[Item base amount] measure that I have marked to one of the measures that are found in the calculated member list. You can insert the measure in the text field just by clicking on it. Find the member you want to use, click "update".
For example, if you would like to see the trend for the default measure "Invoice count" then you would have to replace [Measures].[Item base amount] with [Measures].[Invoice count].
You can also freely edit the calculated member's name.
Setting up "2 year average" report
First, go ahead and follow the instructions on the Report templates library page to import the report's definition that is found here: https://flex.bi/bi/accounts/47/cubes/HansaWorld%20Invoices/reports/1930-2-year-average
Customising the measure
If you would like to change the measure that the trend is about then you have to edit "2 years average" calculated member.
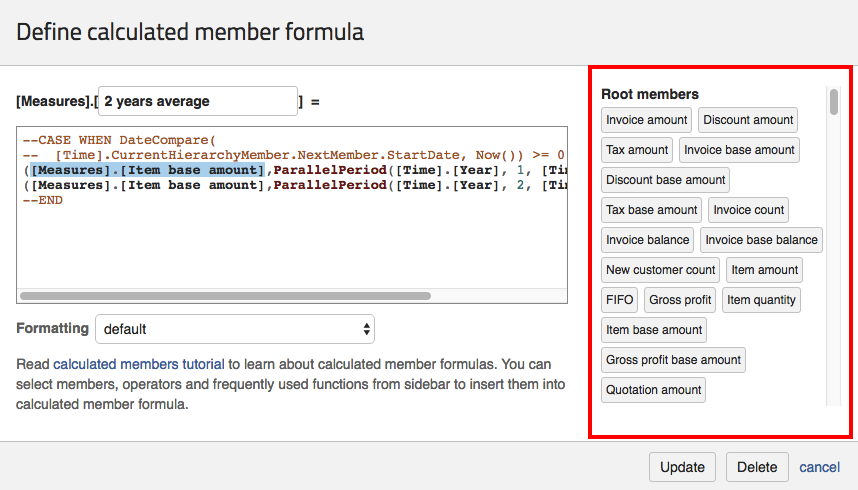
What you have to do is change both of the [Measures].[Item base amount] measures to one of the measures that are found in the calculated member list. You can insert the measure in the text field just by clicking on it. Find the member you want to use, click "update" and have the forecast will change to the measure you wanted.
For example, if you would like to see the trend for the default measure "Invoice count" then you would have to replace [Measures].[Item base amount] with [Measures].[Invoice count].
You can also freely edit the calculated member's name.
Removing past date values
If you would like the report to not show any values for time members in the past then just remove "--" symbols at the start of the 3 lines that have them so it looks like this:
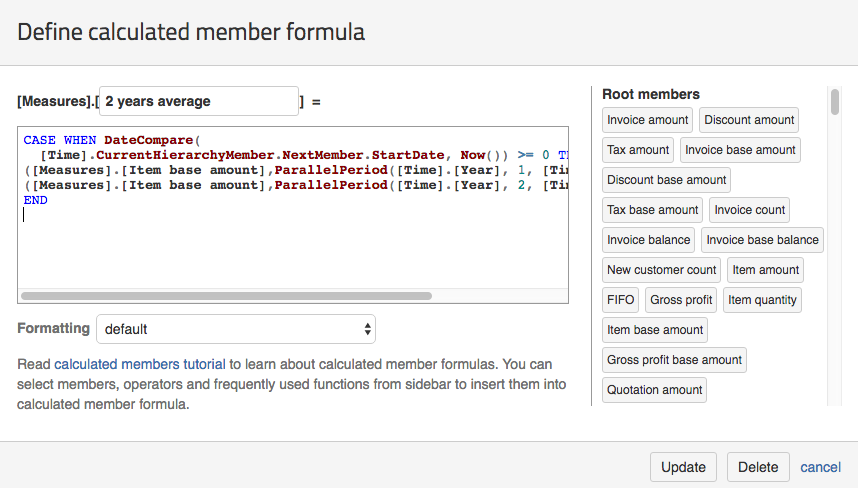
This will make the lines of MDX query to become active and they will make the calculated member not to show values for past dates.
Setting up "Difference Projection/Fact" report
First, go ahead and follow the instructions on the Report definitions page to import the report's definition that is found here:
https://flex.bi/bi/accounts/47/cubes/HansaWorld%20Invoices/reports/2225-difference-projection-fact
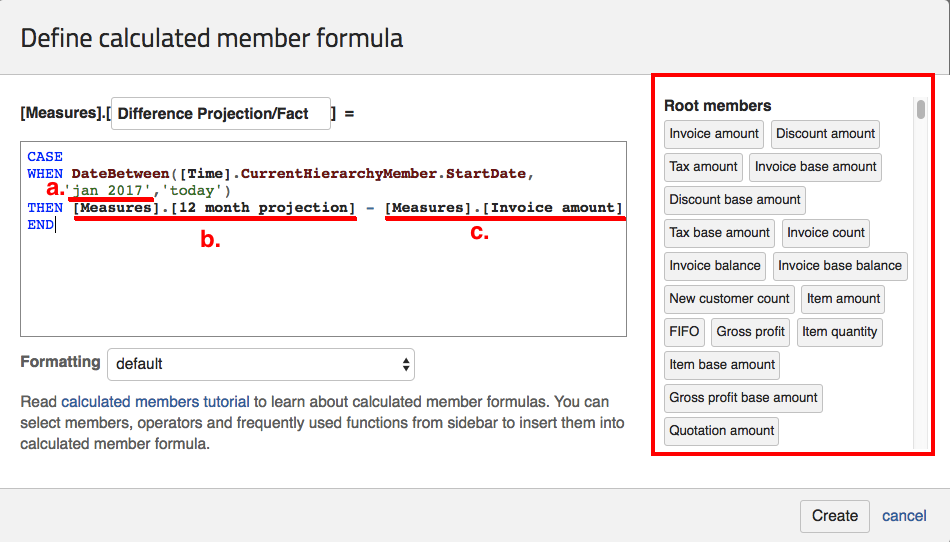
This is the calculated member you will be editing for your customisation:
Customising prediction date range
To customise what date the calculated member is shown FROM replace the a. field that is marked in the picture above with your date. The month name has to be written with the first 3 letter of the actual month name. For example, 'Aug 2017', 'Sep 2014', 'Jan 2016' and so on.
For advanced information about how to write dates correctly visit How to filter Time dimension members - last 3years, time until today?.
Customising the projection/forecast
To change the forecast or projection that is used in the calculated member replace the b. field that is marked in the picture above with your calculated member from the available calculated member list in the red box.
For example, if you would like to see "Difference Projection/Fact" about the "2 year average" calculated member you would have to replace the [Measures].[12 month projection] with [Measures].[2 year average] calculated member (if the calculated member is already created then you can find it in the red box).
Customising the measure
To change the measure that is used in the calculated member replace the c. field that is marked in the picture above with your measure from the available calculated member list in the red box.
For example, if you would like to see the trend for the default measure "Invoice count" then you would have to replace [Measures].[Invoice amount] with [Measures].[Invoice count].
Note that the measure has to match the forecast's or projection's measure for the report to be correct.
You can also freely edit the calculated member's name.
Target forecast for person
First you need to import your target data. In this example we are going to use GP Target data for Person data. If you haven't done it yet, please, follow the instructions in the documentation page Sales person target to import your target data and come back once you are done.
Then you can, go ahead and follow the instructions on the Report definitions page to import the report's definition that is found here: https://flex.bi/bi/accounts/47/cubes/HansaWorld%20Invoices/reports/1949-target-forecast-for-person
Customising target data
If you imported your target data to a different calculated member than the default "GP Target" then you need to adjust the calculated member "GP forecast %".
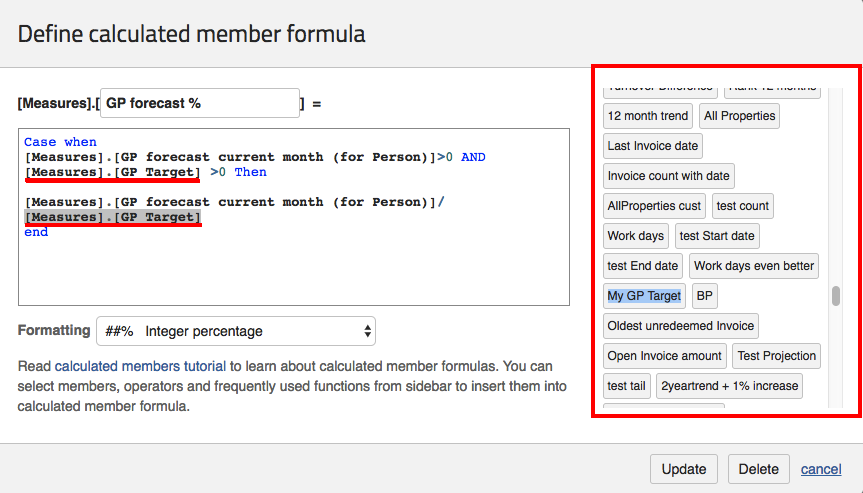
What you have to do is change both of the [Measures].[GP Target] to your target calculated member that can found in the calculated member list. You can insert the measure in the text field just by clicking on it. Find the member you want to use, click "update".
For example, if you imported your data to calculated member "My GP Target" like shown in the example then you would have to replace [Measures].[GP Target] with [Measures].[My GP Target].
You can also freely edit the calculated member's name.
Customising the measure
If you would like to change the measure that the trend is about then you have to edit "12 month trend" calculated member.
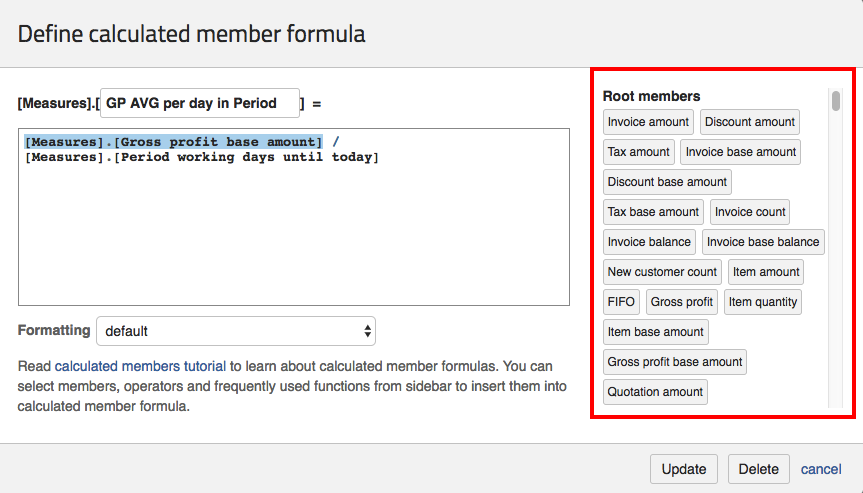
What you have to do is change the [Measures].[Gross profit base amount] measure that I have marked to one of the measures that are found in the calculated member list. You can insert the measure in the text field just by clicking on it. Find the member you want to use, click "update" and have the forecast will change to the measure you wanted.
For example, if you would like to see the trend for the default measure "Invoice count" then you would have to replace [Measures].[Gross profit base amount] with [Measures].[Invoice count].
You can also freely edit the calculated member's name.
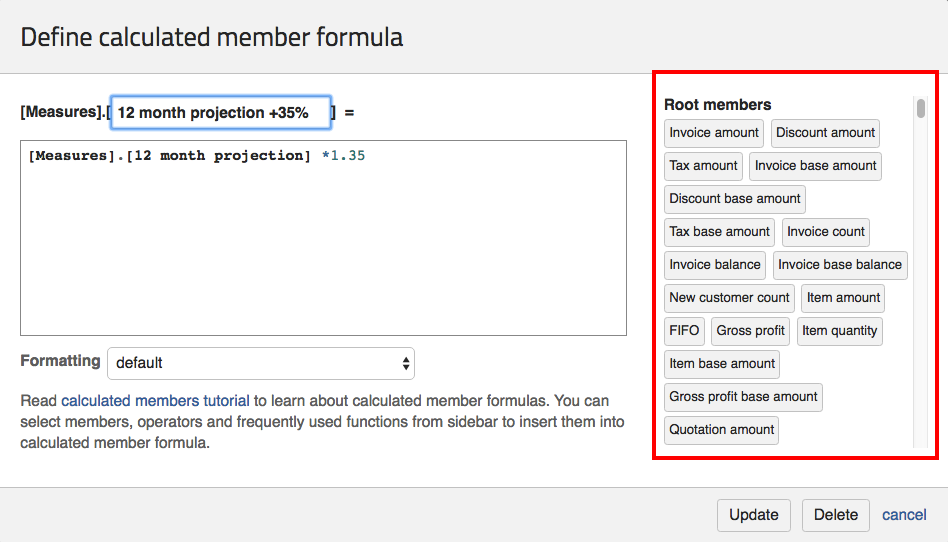
Reports +35%
You can export an example report here: https://flex.bi/bi/accounts/47/cubes/HansaWorld%20Invoices/reports/2245-12-month-projection-35
To create a calculated member that has increased value by a certain percentage choose a calculated member from the red box that's marked in the picture and multiply it by the percentage you wish it to be increased. The percentage has to be in decimal format.
For example, 1.35 stands for 35%, 1 stands for 0%, 1.5 stands for 50%, 1.13 stands for 13%, 0.85 for -15% and so on.